
Winter Camping Shelters
With the arrival of our first substantial snowfall, my intrigue has once again been peaked about winter camping. With this winter’s forecast calling for mild temperatures and heavy snowfall, I feel like this is as good a year as any to get out and finally see what all the hype is about.
Winter camping is much the same as summer and shoulder season camping, with the exception of some shelters. Many people rely on man-made/synthetic shelters in the winter (Huts, tents, bivys, etc). However, natural winter shelters stand alone as some of the most effective shelters you can build. With excellent insulating capabilities, snow can be used to make phenomenal survival shelters. But by blending these natural shelters with man-made synthetics, what was once thought of as an emergency shelter can now be turned into someones first choice shelter option. I will be talking about five different shelter options: 4-season tents, bivouacs, sil-tarps, Quinzhees, and snow caves. Keep in mind there are MANY more types of shelters you can build in the outdoors. Each of the shelters I will discuss offers different advantages and disadvantages, and each shelter is best used in different situations. It is important to know what type of environment you will be venturing into, and what shelter option you will choose.
4-Season Tents
Easily the most popular type of winter shelter on the market, 4-season tents offer added features compared to their 3-season counterparts. Stronger pole construction, solid fabric, full waterproofing, and larger vestibules are some of the most common features you can expect from most 4-season tent. With these added features of course, comes added weight. It seems that a lightweight 4-season tent is out of the question, so be prepared to pack around a bit more added weight.
4-season tents come in both single walled and double walled construction. Single walled tents are lighter than double walled, but do not offer the same degree of breathability. With a double walled construction, the inner layer of the tent can focus on reducing condensation, while the outer layer is used more for weather protection.
Pole location and design is also a factor to consider when using your tent. Most conventional tents will either use two poles, or four poles. It is also not uncommon to see poles located on the inside of the tent (single wall tents). Although this will keep you dry as you pitch the tent, you can accidentally poke holes in the walls/floor of the tent. two pole designs are obviously less time consuming and lighter, but offer less strength. A four pole system is stronger but heavier to carry, and might not be practical for environments where wind wont be an issue. It is important to know what environments you will be using the tent in and how much of a beating it will take. You may find that you in fact need more protection than you thought. Tents can be used just about anywhere as long as you take the time to do a bit of ground maintenance.


Bivouacs
Bivouacs or ‘bivys’ are essentially a weatherproof shell that goes over your sleeping bag. Some winter rated bivys will come with a double pole design to make the area for your head and feet more spacious. Depending on the brand you select, entrance into the bivy is located at either the foot or at the head. Full zip construction ensures total weatherproofing. Most bivys will come with a bug mesh liner on the inside that can act as ventilation in warmer climates, but isn’t overly practical for winter use. These ultra lightweight shelters are exceptional emergency shelters, but it is definitely worth remembering that most wont ventilate nearly as well as required. Moreover, I certainly don’t recommend ever using a down bag inside a bivy. A wet down bag can quite seriously hamper your ability to stay alive in cold climates. Bivouacs can be used pretty well anywhere that you can lay down.
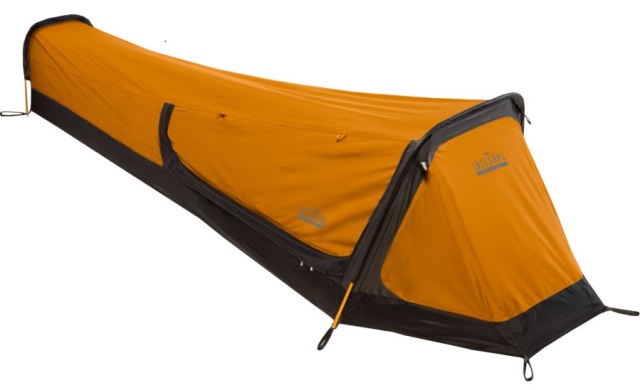
Common winter bivy
Sil-Tarps
Sil-tarps have been around for a long time, and likely became commercialized by guides for their strength and versatility. A tarp can be used to make a multitude of different shelters, and can be used in collaboration with snow to make a fairly robust shelter. Tarps come in many sizes and weights to fit all your needs. For a simple shelter:
1.) Dig into the side of a berm or snow drift creating a vertical wall. This is where you will place the shelter. Butt the open end of the tarp into the wall you dug out.
2.) Support the center seam of the tarp between your trekking poles with a guy wire. Anchor the corners of the tarp to pegs in the surrounding snow. the tarp should be at a fairly steep angle to deter snow accumulation.
3.) If so inclined, build snow blocks and surround the lower portions of the tarp to create a wind block.
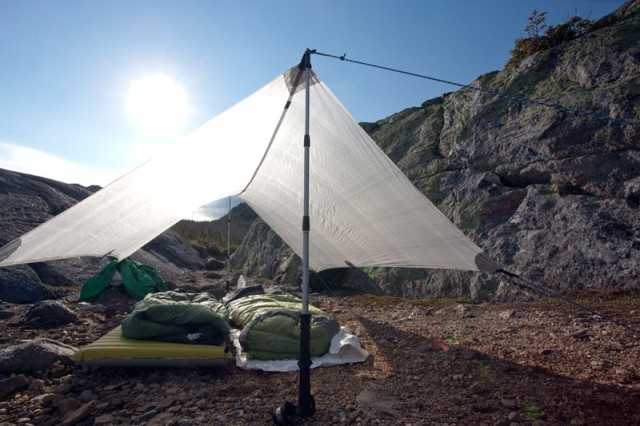
Summer style sil-tarp shelter
Quinzhees
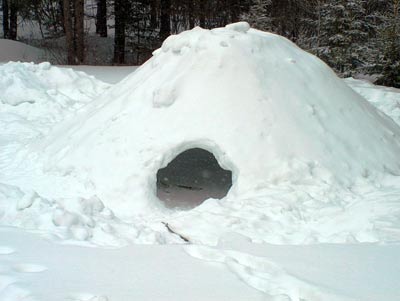
Quinzhees are a fairly basic type of shelter, but they do require a lot of time and effort. Unless you plan to stay in an area for multiple days, I would not recommend building this shelter as it will take you half a day to complete on your own. The idea behind a quinzhee is very similar to that of an igloo. Where an igloo takes tools and expertise, a quinzhee can be built by almost anyone, anywhere that there is enough snow. Snow is an insulator, reflecting your body heat back to you as you sleep. With any snow shelter, you will probably get wet building and sleeping in it, so it is always smart to bring a good sleeping pad with you. A quinzhee is constructed by piling snow into a large mount approximately six feet high, and wide enough for the number of people in your party. Remember to pack the snow as you go! When the quinzhee is about four or five feet high, lay sticks across the snow. This will come in handy when you dig out the shelter. Once you have gathered enough snow into a pile, let it sit for about two hours (longer if the snow is not overly wet). Once the snow has set and recrystallized, you begin by cutting out the door. Make it large enough that you can squeeze through it, but not so big that it compromises the structure. Hollow out the quinzhee until you reach the sticks you laid down. When sleeping in a quinzhee, remember to block the door with your pack to keep out colder air and to help insulate better. A small ventilation hole is not a bad idea either, especially if you are cooking inside the shelter. Like I mentioned before, snow is a great insulator and can be utilized to make great shelters.
Snow Caves
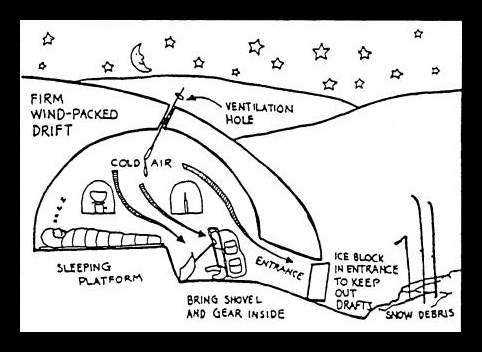
Much like quinzhees, snow caves are built by hollowing out snow from a pile and sleeping inside it. Where a quinzhee is man-made, snow caves often exist in large berms or snow drifts. It is most common to build snow caves to house 1-2 people. If you can, the best place to dig a snow cave is into the side of a hill where a drift/berm exists. This is because the snow cave must be hollowed up, not in. A snow cave should sit at a slight upward angle to stop wind and cold air from moving into the space. much like the quinzhee, close the entrance of the snow cave with your pack to further block cold air. Normally, the heat from a stove cooking supper will be enough to warm the space. Since the snow cave is built on a slope, it is critical to leave an small opening in the roof for CO2 to escape, and to draw air in.
If you have any questions feel free to comment or send me an email. I am always willing to learn more. If you find your self in southern BC this winter, or you have built your own winter shelter, give me a shout and tell me about your trip.
Happy Trails
